")
Update – Click here for a complete, free, in-depth mini course on using the Annual Training Plan.
The Annual Training Plan (ATP) is a macro-level tool that allows users to map out a long-term training plan using periodization. Periodization is a method by which one varies the type, intensity, and duration of training throughout a training year to produce peak performance for an event. Once you’ve set up an ATP, it’s easy to know exactly how an athlete should train now in order to achieve their best results further down the road.
Establishing the Basics

Before setting up an ATP, you need to know the athlete’s races, training history, and schedule.
The ATP’s periodization model assumes that all races are not of equal importance. The ATP reflects that assumption by forcing the user to designate whether a planned race is an ‘A,’ ‘B,’ or ‘C’ race priority, where ‘A’ races are the most important and ‘C’ races are the least important. Priority designations determine whether the ATP periodizes planned training so as to ensure an athlete ‘peaks’ for an event or trains through it.
Next, evaluate an athlete’s training history. If they have a TrainingPeaks athlete account with past data, you can review the TrainingPeaks dashboard charts. Relevant questions to answer include:
- Was their past season successful?
- What was their average volume/TSS per week?
- What were their CTL, ATL, and TSB when they raced?
- Would their performance benefit most from an increase, decrease, or the same volume/TSS per week?
Examining training history ensures that the planned ATP isn’t too easy or aggressive and also serves as an early reality check on the viability of an athlete’s race ambitions.
Before we move on, it’s crucial to get a realistic sense of an athlete’s training availability. An athlete’s past training history might not be indicative of their availability to train in the future. When determining training availability, remember that maximizing training time may not lead to peak performance if they’re not budgeting time to recovery. Some sports impose additional logistical challenges that add to training time and impose additional stress on an athlete’s life.
Choosing an ATP Methodology
Once you’ve determined an athlete’s events, training history, and schedule, it’s time to decide what ATP methodology you’ll use.
TrainingPeaks offers three different ways to periodize your training: duration, average TSS, and event CTL.
ATP by Duration

When planning by duration, the ATP will provide you with a weekly training hour goal, which you will then use to determine the duration of each of the week’s daily workouts. Since an ATP by duration does not take workload intensity into account, it is the least precise ATP planning method. We recommend planning an ATP by duration for beginners.
ATP by Average TSS

The second ATP methodology is planning by average TSS. This methodology requires familiarity with metrics like TSS, CTL, ATL, and TSB, which you can read about here. By entering a weekly average TSS, the ATP will automatically calculate weekly TSS targets and will model future Fitness, Fatigue, and Form in the Performance Management Chart. This way you can see what your Fitness will likely be on race day. Since TSS represents the workload of a training session and takes both duration and intensity into account, it is a more precise ATP planning method than duration. We recommend planning an ATP by average TSS for intermediate to advanced users and/or for athletes that frequently race like road cyclists or runners.
ATP by Goal CTL

The last ATP methodology is planning by goal CTL. Suppose you know the Fitness (CTL) you would like the athlete to achieve on race day (based on experience or our recommended guidelines). In that case, you can enter that target, and the ATP will automatically back-calculate the required weekly TSS to arrive at that goal CTL. Since an ATP by goal CTL periodizes training using TSS, it, like an ATP by average TSS, it’s a more precise way of planning than duration alone. We recommend this method for intermediate to advanced users and/or for athletes with only a few important races like triathletes.
Setting up your Annual Training Plan
Once you’ve chosen your ATP methodology, it’s time to create your ATP. To build your ATP, open the TrainingPeaks web app and click the ATP tab, click on an ATP, and click the ‘+’ icon.
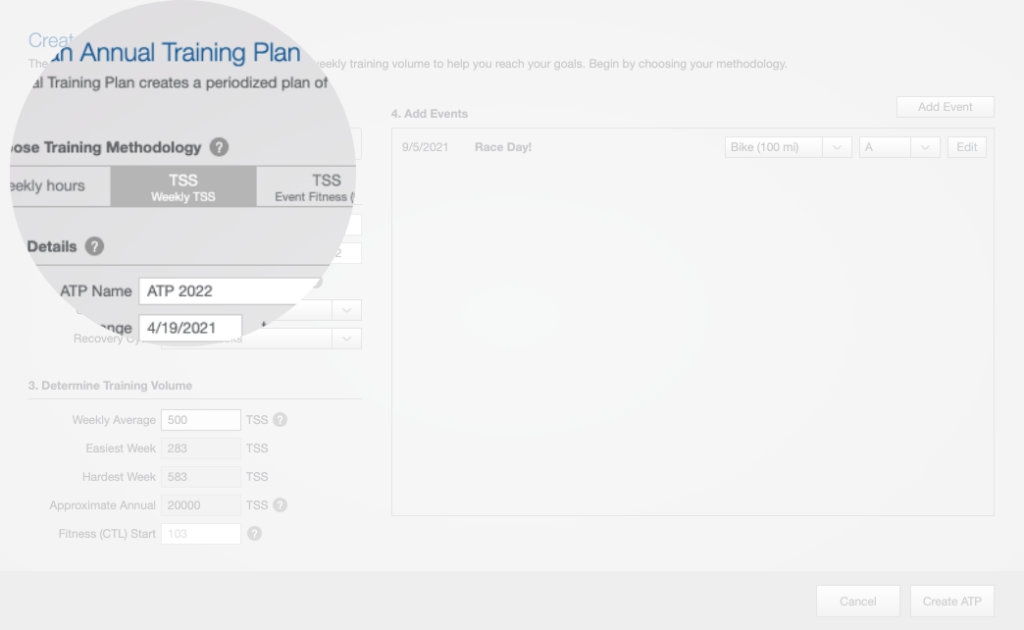
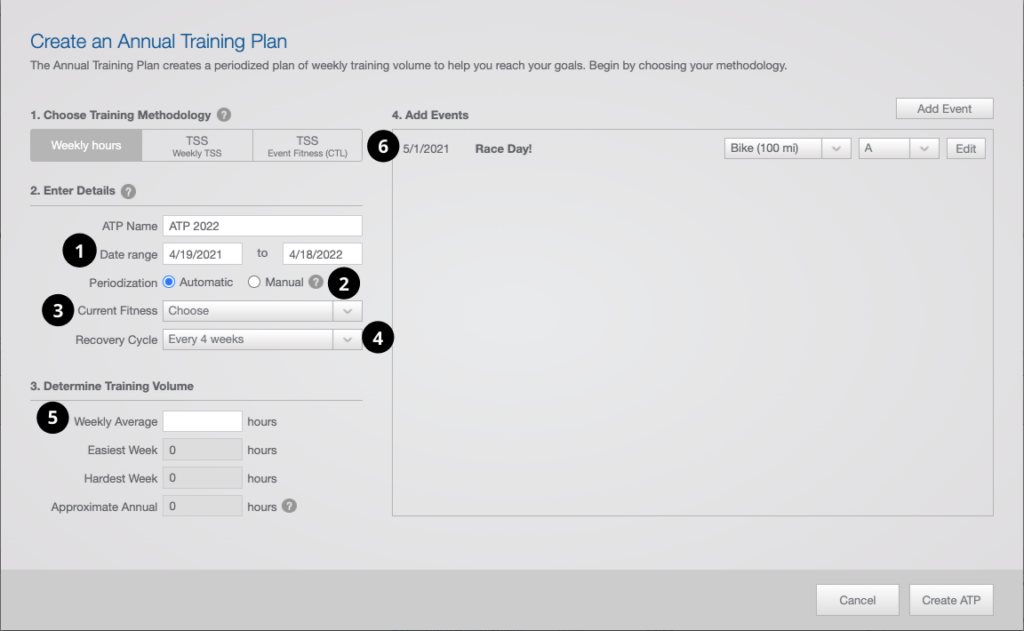
1. Date Range
First, select your date range. The minimum required length of an ATP is nine months, however, A races can be scheduled earlier than the end of the ATP. (‘B’ and ‘C’ races, by default, will not prompt the ATP to ‘peak’ your training). The minimum required length encourages planning an entire season while still allowing for flexibility. Please note that the ATP counts weeks starting on Monday, which is the first Monday available after the start date selected in the dropdown.
2. Automatic vs. Manual Periodization
The next step is to pick between automatic vs. manual periodization. Automatic periodization creates an ATP based on Joe Friel’s methodology, which uses linear (general to specific) periodization. Manual periodization makes a blank ATP with a specified number of weeks so the coach or athlete may customize it based on their own methodology. Please note that you must use manual periodization if you wish to use a polarized or reverse periodization model. Manual mode with TSS (Event Fitness (CTL)) creates a linear progression to the specified event CTL goal.
3. Strong vs. Weak Fitness
Your next choice in the ATP Builder is choosing between strong versus weak fitness. Don’t let the terms mislead you. Strong fitness means the athlete has a strong endurance background, e.g., has trained for many years. Weak fitness means the athlete has a limited endurance background, e.g., is new to endurance training or hasn’t trained consistently.
The more you’ve trained, the faster you can recover between races. Conversely, the less you’ve trained, the more recovery you’ll need between races. Selecting ‘weak’ will add base periods between races, whereas the strong option will not.
4. Recovery Cycle
Next, pick the recovery cycle. In a four-week cycle, the ATP periodizes your training with a three-week block and then a rest week, which we recommended for experienced athletes or younger athletes (under 40). In a three-week cycle, the ATP periodizes your training with a two-week block and then a rest week, which we recommended for inexperienced athletes or older athletes (over 40).
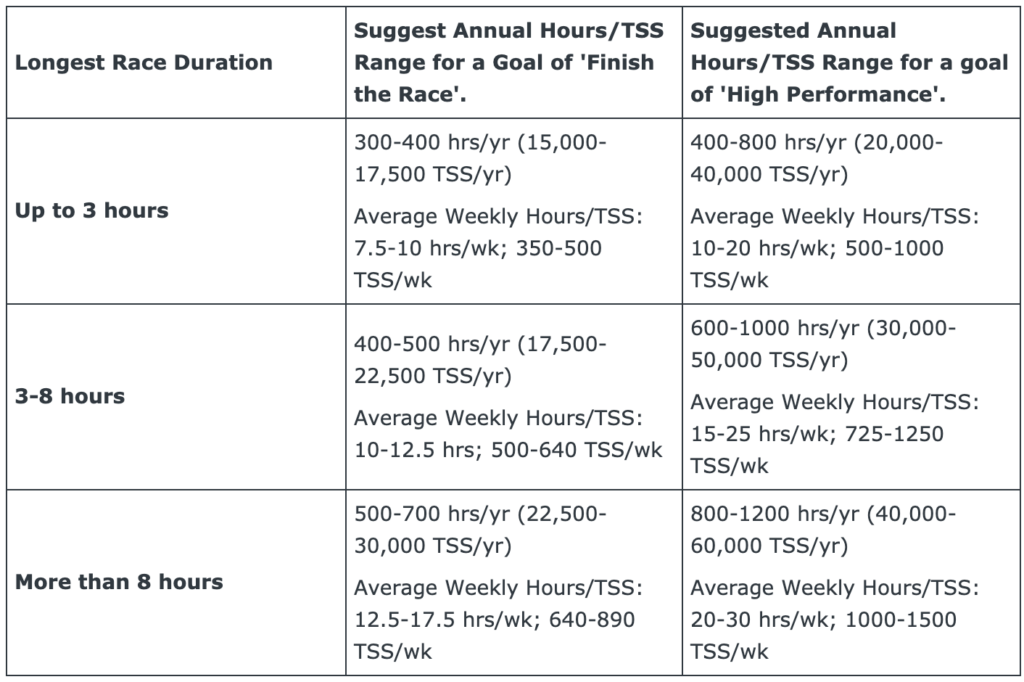
5. Annual Training Hours/TSS
Now, you will determine the athlete’s annual training hours. The table below is an approximate guide for determining annual training volume based on your longest race’s expected duration in the season and your goal for the event.
6. Add Athlete Events to the ATP Wizard
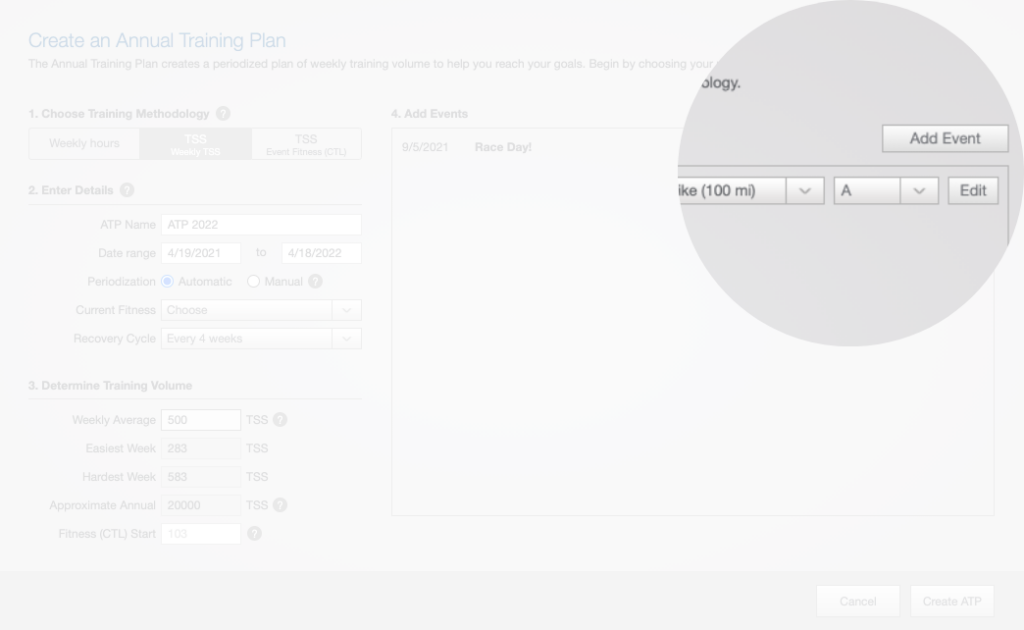
Take a look at your prioritized list of the athlete’s races and add them to the right-hand side of the ATP Builder.
Add the athlete’s scheduling limitations like vacations, time off, or work obligations into the ATP as ‘C’ events. C priority races don’t affect the ATP, they are meant to be training races with no peak or adjustment in training leading up to them. Labeling them as “C” makes it easier to see where they fall in the overall season plan. You can also label limitations to get a more complete picture of the athlete’s overall schedule.
Please note that if you’re using an ATP with automatic periodization, you must have at least one ‘A’ race. ‘A’ races must be within 32 weeks (4.5 months) of each other and 48 weeks of the ATP’s start. If you have chosen the TSS Event Fitness (CTL) methodology, you are required to enter a CTL value for one or more of your A or B priority races.
*Please note that if you enter events directly into the TrainingPeaks athlete calendar, they will also appear in the ATP wizard. Athletes/Coaches may find it easier to have athletes enter their events on the TrainingPeaks calendar themselves.
Understanding Your Annual Training Plan
When you select an ATP that uses an automatic periodization method, TrainingPeaks creates a periodization plan using the following considerations to determine the appropriate period:
- Where you are between ‘A’ priority races
- Whether you chose Strong vs. Weak in the ATP builder
- Whether you chose a three or four-week recovery cycle in the ATP builder
- Weeks until your ‘A’ event
By default, the Annual Training Plan uses period names and limiters from Joe Friel’s methodology. What follows are the periods and the suggested period lengths:
- Transition: 1-6 weeks
- Preparation: 3-4 weeks
- Base: 8-12 weeks
- Build: 6-8 weeks
- Peak: 1-2 weeks
- Race 1-3 weeks
Once you have all those races entered* and you’re satisfied with your prior selections and methodology, you can click ‘Create ATP.’
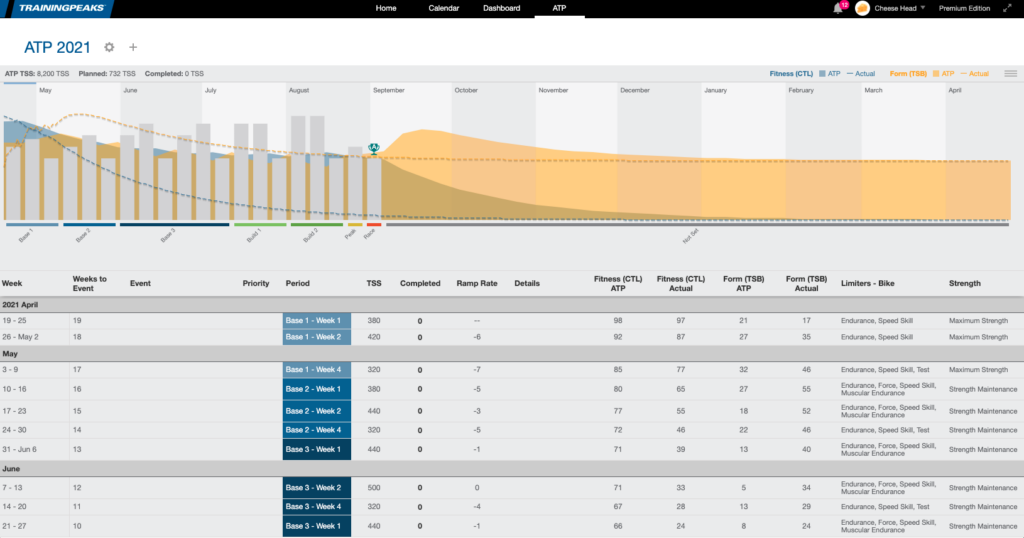
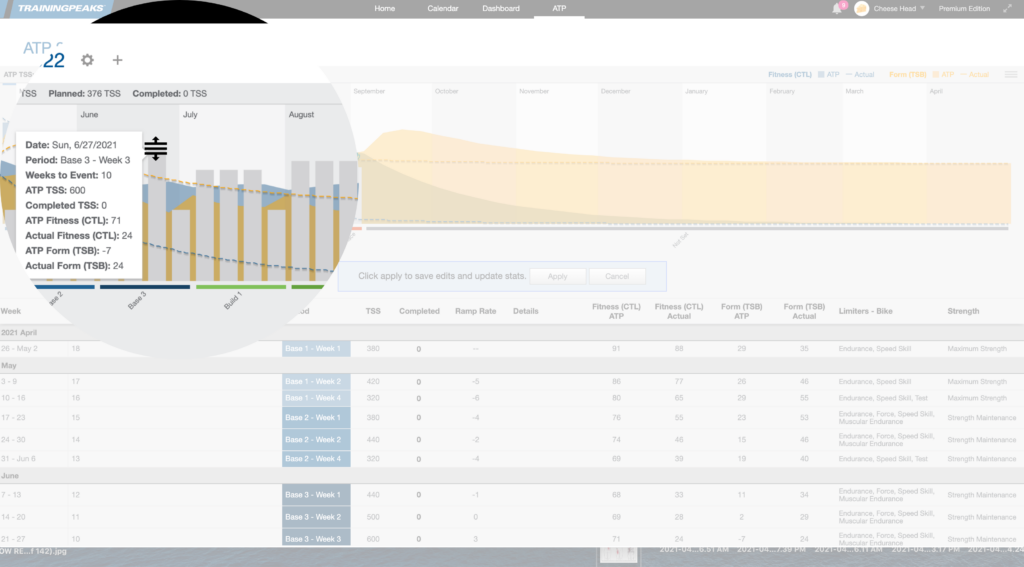
TrainingPeaks will then produce a chart of the ATP with rows representing each week along with a periodization label and suggested limiters. If you’ve planned by average TSS or Goal CTL, the chart will also show actual vs planned TSS, Ramp Rate, Actual and Planned CTL and Actual vs Planned TSB.
Grab that list of known scheduling conflicts and adjust the ATP duration/TSS up or down. For example, you might increase the planned duration/TSS for training camps or decrease the planned duration/TSS for vacations, family functions, or work conflicts.

You can adjust the duration/TSS bars either by inserting your cursor into the planned duration/TSS cell and entering a new value or by using your cursor to drag the bars on the ATP graph up and down. As you adjust those planned training values you’ll notice planned CTL and Form changing.

If your planned duration/TSS manipulations increase the planned CTL of the athlete too rapidly, you will see a ramp-rate pop-up window appear which means that the planned duration/TSS resultant in athlete’s change in CTL week to week might be too rapid and could result in injury or illness. More on Ramp Rate later.
Abilities/Limiters
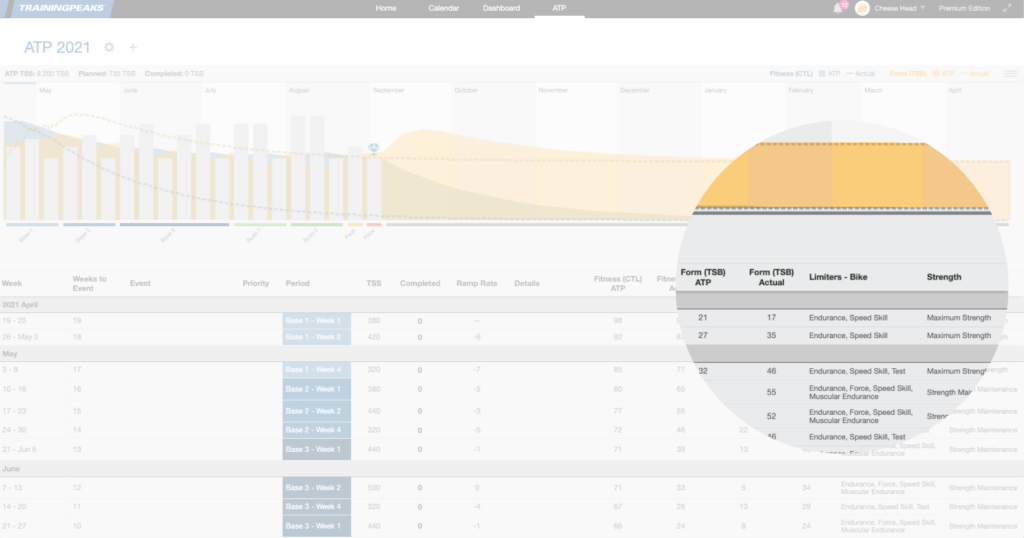
On the far right of the Annual Training Plan graph, you will see sport-specific limiters listed for each training period.
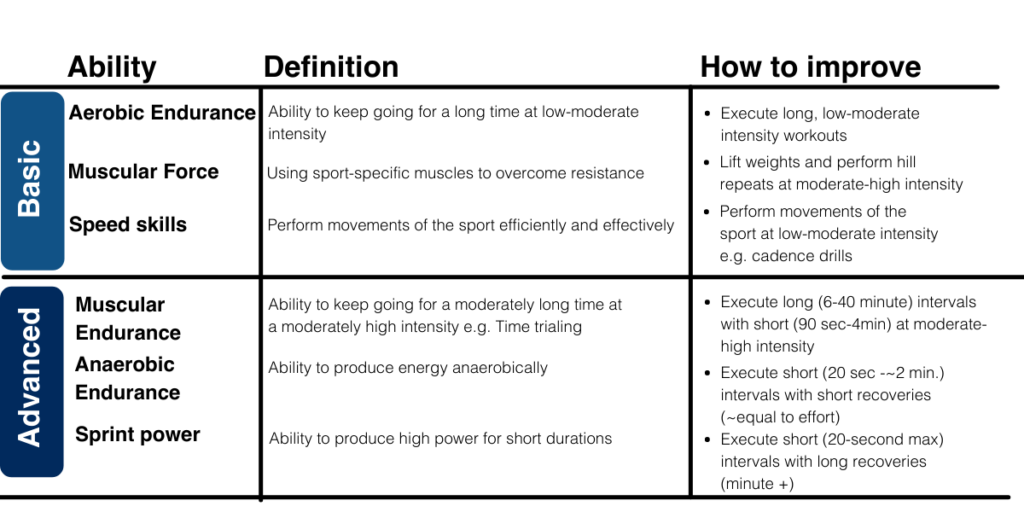
Before we go into limiters, we need to discuss training abilities. Six training ability categories exist and all derive from the three determinants of fitness: aerobic capacity, anaerobic threshold, and economy.
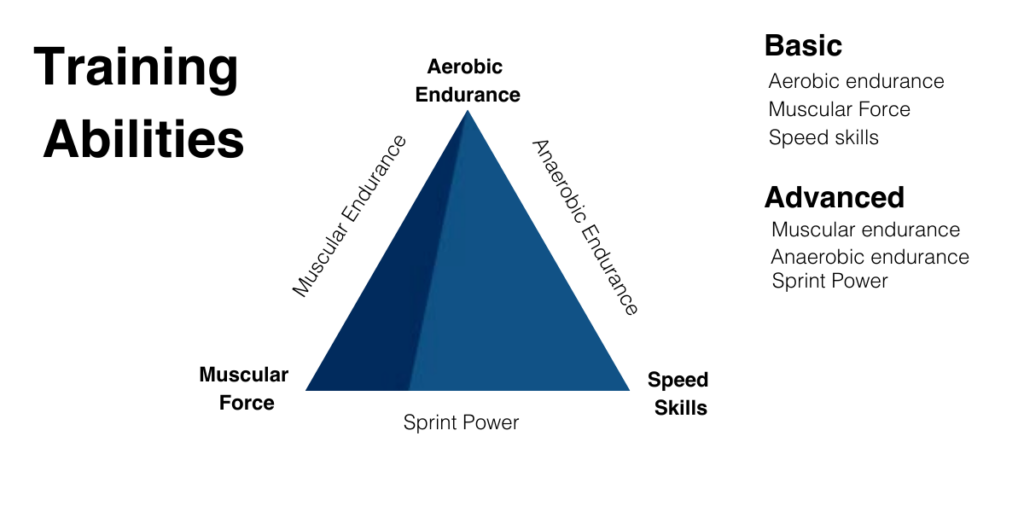
Basic abilities are the most important of the six abilities because they are foundational to race-specific fitness. The more developed these abilities, the greater race-specific fitness potential. Conversely, weak development of basic abilities limits race-specific performance.
Advanced abilities are the key to high-performance racing (provided sufficiently developed basic abilities). Race performance depends on switching training to advanced abilities in the build period. Unlike basic abilities, it is counterproductive to train advanced abilities for more than eight to twelve weeks because the stress of these workouts can lead to burnout, illness, or injury.
Now that we’ve covered training abilities, we can turn our attention to Limiters. Limiters are goal-specific ability weaknesses that decrease the chances of accomplishing a seasonal goal
Notice here that not all training ability weaknesses are goal limiting. e.g., if your athlete’s weakness is climbing hills, but their goal is placing well in a criterium, then their ability weakness is not a limiter.
How do you know what your athlete’s limiter is? When their weakness matches up with the demands of a race. Generally, determining limiters is straightforward e.g. an athlete has weak sprinting ability and wants to excel in criterium races.
Once you know your athlete’s limiters, pick period-specific workouts that address these training ability weaknesses. For example, if an athlete is in the base period of the annual training plan, their goal events are criteriums and they have weak speed skill abilities an appropriate workout to schedule would be cadence drills to improve their leg speed.
Using the ATP to Plan Weekly Training
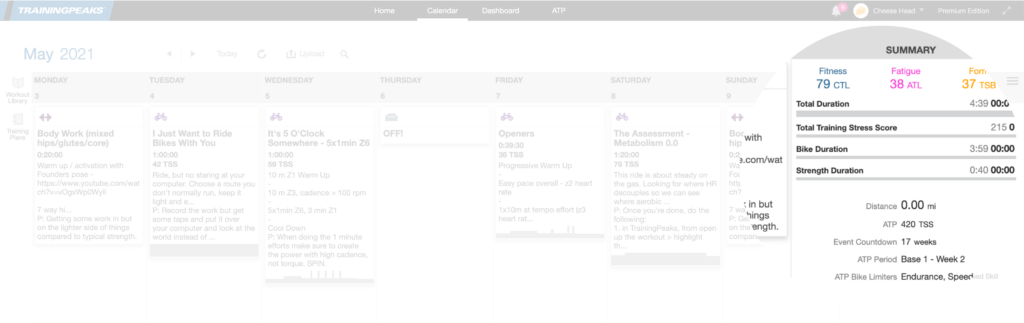
Now, you’re ready to plan out the weeks using the ATP. When you’re planning, refer to the weekly summary – the athlete’s suggested volume/TSS and limiters appear there. If the Annual Training Plan labels do not appear in the athlete’s weekly summary, follow these steps:
- Click your name
- Settings
- Layout
- ATP
- Drag ATP available items from ‘available’ to ‘in-use’ box.
Once you can see the ATP labels in the weekly summary, grab your athlete’s schedule (or, better yet, have them add their availability to their TrainingPeaks athlete account so you don’t have to remember their schedule) and start planning.
Workout Planning Order
Keep in mind, the following workout planning guidelines are just one of many successful ways with which to plan an athlete’s workouts.
- Plan the key workouts first, like days off, high volume workouts, and high-intensity workouts.
- Complete the rest of the week, adding strength workouts, recovery workouts, technique workouts, or mobility/yoga.
- Check and adjust the weekly plan so that it matches the ATP. Start with planning two to four weeks at a time. Minimize planning further out because you’ll likely need to adjust as the athlete’s schedule changes.
Finally, your athlete can start training!
Adjusting the Annual Training Plan
When events or interruptions arise that necessitate training changes, it’s essential to adjust the ATP to keep an athlete’s long-term planning on track. Adjust the ATP using the ATP visual editor. You can either adjust the graph itself or edit the cells to modify duration/TSS values as needed.
Using Ramp Rate

If you’re using an ATP by average TSS or goal CTL, you can also see how your adjustments affect an athlete’s predicted CTL, ATL, and TSB. You may also notice a useful feature in the ATP chart called ramp rate.
Ramp rate measures how rapidly an athlete’s CTL or ATL increases or decreases over time. If the ramp rate is flat, fitness is probably stagnant. If it’s rising, fitness is likely increasing, if decreasing, an athlete is probably losing fitness.
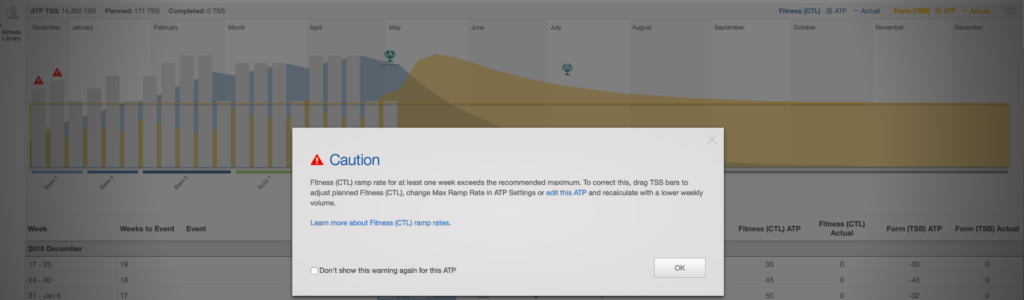
As you adjust an ATP, ramp rate warnings may appear. These may indicate that the planned TSS is producing a ramp rate that increases the chance of injury, illness, or overtraining.
Meaningful changes to fitness take time, so it’s essential to plan TSS in a way that produces a sustainable ramp rate. Typically, a ramp rate of three to eight CTL per week works for most athletes. However, an athlete’s ideal ramp rate is individual and determined by their training background, genetics, and recovery habits.
ATP Details – Spend Time to Save Time

Throughout the planning and training process, add notes to the Athlete Details section of the ATP.
Helpful notes to add are FTP increases, racing results, or general quick summaries of the training week. These ATP detail notes serve two important purposes:
- They help you see an athlete’s entire season at a glance and identify trends you would otherwise miss if you only looked at the TrainingPeaks calendar.
- They provide invaluable information you can use to inform planning for next season.
Overall, adding short notes in the Detail section of the Annual Training Plan provides further insight into how this particular athlete reacts to training and what type of training leads to their best performance now and in the future.
